Maya’s Day of the Dead Cookies Recipe
Fun Alice Medrich Day of the Dead skull cookie recipe made from vanilla and chocolate dough.
This time of year is always my favorite for both cooking and taking pictures. I look forward to the squashes, pears, and apples flooding the markets almost as much as I look forward to the parades, processions, and celebrations that take place around Halloween and Dia de los Muertos. Dia de los Muertos is visually and spiritually stunning and I love to walk to the Mission district to see the procession and view the elaborate alters created in the neighborhood parks.
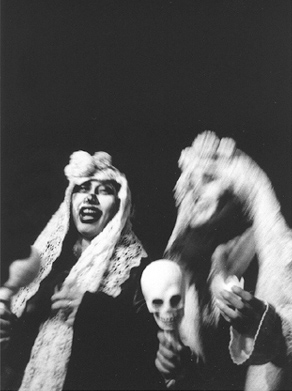
Dia de los Muertos, San Francisco
Aztecs had been celebrating the Day of the Dead for thousands of years before the Spanish arrived. Apparently the celebration originally took place in the summertime around July and August on the Aztec calendar, but feeling as if the ritual was sacrilegious Spanish priests tried to eradicate it. Dia de los Muertos was moved either by Spanish priests (or as a concession by the native people) to coincide with the Christian holiday, All Hallows Eve.
November 1st is All Saints Day and November 2nd is All Souls Day, collectively known as Dias de los Muertos. During this period of time each year many Latinos celebrate and honor the souls of the deceased who are believed to return to eat, drink, and celebrate with their Earth-bound relatives -- (I thought it was primarily a Mexican ritual, but my friend from El Salvador said many Central American countries observe Day of the Dead as well). People from different regions celebrate slightly differently but generally speaking the ritual takes place to honor the dead -- death being viewed as simply part of the continuation of the cycle of life and not something to fear. It is a reflective and celebratory time, and not supposed to be scary or sad.
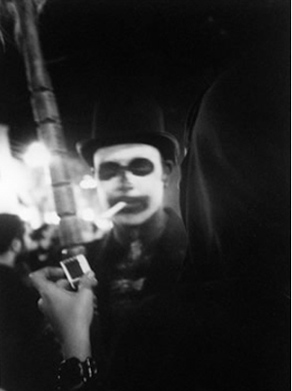
All Hallows Eve, San Francisco
Grave and alter preparation is a family affair as people congregate in the cemetaries. Each site is adorned with the favorite foods, drinks, and personal belongings of the deceased. Marigolds, chrysanthemums, and candles are placed on the graves and help to guide the spirits home. Stories are told featuring the dead and bells begin ringing in the early evening to summon the spirits and ring at regular intervals throughout the night.
Food plays an intricate part in this celebration and there are all sorts of edibles associated with Dia de los Muertos varying from region to region. Favorites of the deceased are prepared using upmost care and quality. Time-intensive 'special-occasion' foods are made including moles, tamales, pan de muerto, sugar skull candies and marzipan, oh, and plenty of traditional liquors like mescal.
Unfortunately, I don't know much more about the food or ritual of Day of the Dead.... Some specific towns and regions are well-known for their observances of this particular celebration and I hope to travel to one of the towns or regions next year to learn more if possible.
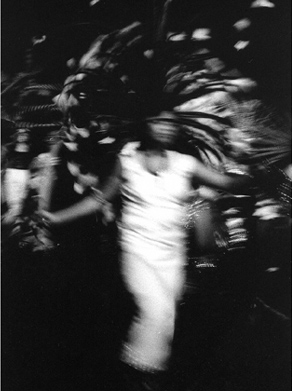
Dia de los Muertos, San Francisco
So, onto the recipe....I came across these Day of the Dead cookies last year, and I marked my calendar to make them - they aren't exactly traditional, but I thought they looked fun. I debated between this recipe and the Day of the Dead bread on page 134 of the Cheese Board Cookbook which I also had tagged.
There are a couple things you should know if you are going to embark on making these cookies -- In the spirit of Dia de los Muertos food preparation, these are indeed time-intensive to make. You might need to reach out to your Eastern influences as well to summon up patience and serenity when it comes to rolling and slicing the dough. The cookies tasted standard (exactly what you would expect from a simple vanilla and chocolate cookie) and the next time around I will probably add some cinnamon to the chocolate dough for a little kick -- and big grained sugar spinkled on the faces for texture and a bit of added sweetness before baking.
Some tips:
-You need to keep the dough well chilled at all times.
-You will need to remake each of your faces after you slice.
-I used dental floss to slice the dough. I didn't want the drag of a knife to smash my skull shapes.
-I also cut the dough logs in half so making the faces was more exact.
One other note, the recipe says it will yield about 36 cookies. I ended up with about 18 (maybe mine were just on the big side)...Other than that, the cookies are very straight forward and cute when they were completed.
Premium Ad-Free membership includes:
-Ad-free content
-Print-friendly recipes
-Spice / Herb / Flower / Zest recipe collection PDF
-Weeknight Express recipe collection PDF
-Surprise bonuses throughout the year
Maya's Day of the Dead Cookie Recipe
Vanilla dough:
2 cups all-purpose flour
1/2 teaspoon baking powder
1/4 teaspoon salt
8 tablespoons (1 stick) unsalted butter, softened
1 cup sugar
1 egg
1 1/2 teaspoons vanilla extractChocolate dough:
1 cup all-purpose flour
1/2 cup unsweetened cocoa powder, Dutch process
1/2 teaspoon baking soda
1/4 teaspoon baking powder
1/8 teaspoon salt
8 tablespoons (1 stick) unsalted butter, softened
1/2 cup (packed) brown sugar, lump free
1/2 cup granulated sugar
1 egg
1 teaspoon vanilla extractEquipment:
Baking sheets lined with parchment paper
To make the vanilla dough, mix the flour, baking powder, and salt together with a whisk or a fork. Set aside.
In a large mixing bowl, beat the butter and sugar with an electric mixer until light and fluffy, 3 to 4 minutes. Beat in the egg and vanilla. On low speed, beat in the flour just until incorporated. Form the dough into a log about 2 inches in diameter. Set aside.
To make the chocolate dough, in a medium bowl, mix the flour, cocoa, baking soda, baking powder, and salt together thoroughly with a whisk or fork. Set aside.
In a large mixing bowl, beat the butter, brown sugar, and granulated sugar with the back of a spoon or an electric mixer until smooth and creamy but not fluffy (less that 1 1/2 minutes with an electric mixer). Beat in the egg and vanilla. On low speed, beat in the flour mixture and mix just until incorporated. Form dough into a log the same length as the vanilla log. If the dough is too soft and sticky to handle place it in the freezer to firm (note from heidi: this is important).
To shape the skulls, reshape each log of dough so that it is skull shaped rather than round: make one side narrow for the chin and jaw and leave the other side wide for the cranium. Wrap and refrigerate the chocolate dough. Form features in the vanilla dough, using the handle of a wooden spoon to poke holes for eyes through the entire length of the log. Form the nose with a skewer, poking two holes for nostrils. Form the mouth by inserting a narrow table knife and wiggling it back and forth to lengthen and widen the opening. Don't try for perfection: irregular holes make the best and weirdest skulls. Wrap and refrigerate the vanilla dough. Chill both doughs at least 2 hours, preferable overnight.
Position rack in the upper and lower third of the oven. Preheat the oven to 350 degrees. Cut the chocolate dough into 1/8-inch slices and place them at least 1 1/2 inches apart on the lined baking sheets. Cut the vanilla dough into 1/8-inch slices and place 1 slice on top of each chocolate slice. Bake until pale golden at the edges, 12 minutes, rotating the baking sheets from top to bottom and front to back halfway through the baking. Slide parchment liners onto cooling racks or transfer the cookies directly from the pan to the rack with a metal pancake turner, waiting 1 to 2 minutes if necessary to let the cookies firm up before moving them. Cook cookies completely before stacking or storing. Cookies keep at least 1 week in an air-tight container.
Recipe from: A Year in Chocolate : Four Seasons of Unforgettable Desserts by Alice Medrich (Warner Books) - reprinted with permission.
Comments are closed.
Apologies, comments are closed.
Comments
Hey Maya!
Thanks for the great recipe. The cookies were a big hit when I gave them to friends! Looking forward to future recipes 🙂 -h
Yes, that Maya.
I’m glad you’re enjoying the cookies! There never is enough space in the books to explain everything–another tip to use next year is to cut the skulls side-to-side instead of top to bottom or bottom to top. The cutting also goes much faster if you use a sushi knife and cut all of the slices before doing the assembly.
They are sorta disturbing! But cute in an eerie sort of way. 🙂
These are darling! I just had to make them after I saw yours. I’m so glad I did. Thank you!
ps. I did add cinnamon to the chocolate dough. 1/2 tsp. was perfect.
Well, you almost forget about how long they take to make by the time they come out of the oven and you’ve got all these distinctive looking faces staring back at you. I immediately had a couple favorite faces on the cookie sheet and felt a pang of sadness as my friends gobbled them up. -h
heidi, these look great. i’ve been wanting to make them for so long, but it seemed like such a pain. you might just have inspired me to try them for this halloween.
Wonderful undertaking but way too labor intensive to waste on candy seeking young ‘uns! Save these to impress the bridge club, book club or staff at the office!
Nice find!
Wow; I wanna try these! I think the parents on my block would call the police if I handed these out to the children for Halloween, though…
mmmm spoooooky but pretty o_o
Comments are closed.
Apologies, comments are closed.
More Recipes
Weekly recipes and inspirations.
Popular Ingredients