How To Make a Sourdough Starter
Grab some whole grain rye flour and I’ll show you how to make a sourdough starter! A lively, vigorous natural sourdough starter is the core component in beautiful loaves of bread, sourdough pancakes, pizzas, and so much more. You can make your own starter with flour, water, the natural yeasts and bacteria in the air, and a bit of patience. Find a glass jar and let’s go!

If you’re serious about incorporating sourdough baking into your life, you’ll likely embark on an intimate relationship with a natural sourdough starter. It’s one of the building blocks of sourdough baking, made from flour, water, yeasts and bacteria in a surrounding environment. It’s the wild stuff, and it’s what makes sourdough bread special.
There are a number of ways to acquire a sourdough starter. A friend might gift you some of theirs. You might ask for a small amount from a favorite bakery. You can buy dehydrated starter with a range of pedigrees all over the internet, or you can do what I typically do: make your own. Knowing how to make your own starter is a great skill to have and a real confidence builder on the baking front. This page will walk you through how to make a sourdough starter, highlight some tips and tricks, and generally get you pointed in the right direction. I’ve done this a dozen different ways over the years, and currently this is my favorite approach.
How To Make A Sourdough Starter: Start with Rye Flour
If you want to make this process easiest on yourself, start with rye flour. You can make a sourdough starter using just about any kind of grain-based flour, but whole grain rye flour seems to contain all the good stuff needed to get a starter going fast. Whole wheat flour also works well (in comparison to white flour), but whole grain rye flour is the real-deal champion. You should be able to get a rye flour sourdough starter going relatively quickly, then easily convert it to a wheat starter. To convert, simply discard most of the rye starter and start feeding the remaining bit a blend of wheat flours and water. Boom. Converted. You'll be ready to proceed with many of the sourdough recipes you come across.
Making A Sourdough Starter: Tips & Best Practices
There are a number of things you can do to help lock in your success when I comes tome to make a new, fresh starter. Here’s a list of what I keep top of mind:
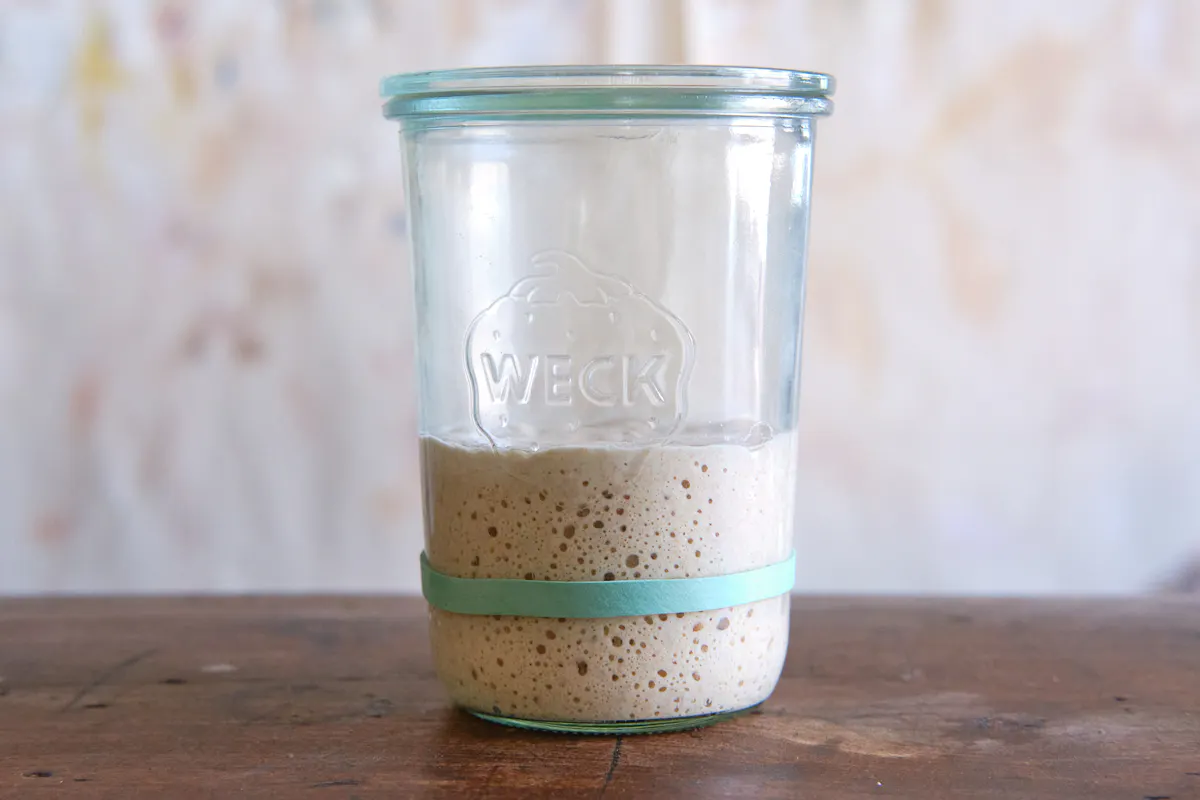
- Glass: Use a glass container for your starter. This lets you get a good view of the bubbles and activity going on below the surface. I use Weck Jars.
- Skip the Anti-bacterial Soap: When you wash your hands prior to mixing your starter, use a regular soap. Not something that is anti-bacterial. They are equally target both bad and good bacteria, and you want to give the good bugs a chance to thrive.
- Keep it cozy: Making a sourdough starter in a warm, cozy kitchen is much easier than attempting to do the same in a cold one. My kitchen runs a bit cold, but the cabinet above our refrigerator runs warmer, and there’s a sunny spot on the counter I sometimes use. A general rule of thumb I like to think about is: if I'm feeling nice, warm and cozy - my starter likely is too.
- Water: Consider using filtered water if you've had trouble with getting a starter going in the past. Chlorinated water could be a problem and many water filters can address this.
Once your starter is going:
- Timing & Consistency: Pick a consistent time of day to do your starter duties. For me, mornings around 9am work best. My kitchen temperature is typically around 70-73°F.
- Regular Feedings: Always give your starter a few days of regular feedings before baking with it. If you’ve missed a couple days of feeding, start regular feedings again before attempting to bake.
Video: How To Make a Sourdough Starter
How to Stir: Fingers, Spoon, Etc.
It’s common to learn that you should use your fingers to mix and stir your starter as you attempt to get it going. This is, in part, because some of the bacteria on your hands can help it get going. Another reason? You get a better feel for what is going on with your baby starter. It’s a reminder to use all your senses: smell, sight, touch, etc! When you stir with your fingers you can feel the texture of your starter, the lightness or density, and overall viscosity. It’s a great way to get to know your starter in the beginning. That said, when in maintenance mode, doing my daily feedings, I tend to use a spoon - less messy.
Is My Starter Ready to Bake With?
I’m a fan of the Float Test. You can tell quite a bit about your starter simply from looking at it, or giving it a smell, but the float test is a technique gives confidence. If you aren’t sure if your sourdough starter is ready to mix into a dough, do a float test. Fill a small glass with room temperature water. Drop a teaspoon of the starter into the glass of water. If it floats, it’s ready to use. You should also see bubbles on the sides and top of the starter. You should notice a good amount of rise as well. The starter in the photo above is not ready to bake with, no bubbles, 24 hours since last feeding. You can see the difference between this one and the lead photo - lots of bubbles and ready to go!
What Kind of Water Should I Use
I’ve never had trouble using tap water to get my starters going (in both San Francisco and Los Angeles). I’ve also had good results using water filtered through a pitcher. But everyone has different water sources, and if you’ve had trouble getting a starter going in the past, consider trying filtered water. Chlorine can inhibit a starter from developing and many water filters can help you over this hurdle.
When to Transfer to a Clean Jar
I like to move my starter to a fresh jar every 3-4 days, or so. This avoids buildup on the sides of the jar and generally makes cleaning the jar easier than if you wait longer.
Is my Sourdough Starter Healthy?
Again, you’re going to use all your senses again to know if you have a healthy sourdough starter or not. A healthy starter is relatively uniform in consistency. It show regular activity (bubbles and steady rise) in the hours after feeding, and then a gradual collapse. This cycle (feed, rise, fall, feed, rise fall) should happen each time you give your starter a regular feeding. It will smell mild and creamy just after feeding and sharper and more acidic after it peaks and deflates.
This cycle should be consistent and predictable.
- If your starter develops mold, start over.
- Weird streaks? Start over.
- No activity after a few days? Keep going with the instructions outlined below, but make extra sure your starter is cozy, warm and happy.
How To Store Sourdough Starter
I tend to keep my starter on the kitchen counter and feed it daily. If I need to take a break I like to use the method from Richard Hart’s Bread book. You basically take a small spoonful of starter, add a few tablespoons of flour and stir it together until it is dry, shaggy, and sort-of dehydrated looking. I put this small jar in the refrigerator until I’m back home. To reboot the starter: add enough water and fresh flour so it starts looking like my starter again, and start a consistent feeding schedule for a few days until it is happy, bubbling, vigorous, and predictable.
More Sourdough Recipes
- Sourdough Granola
- Sourdough Galette with Delicata Squash
- Roasted Tomato & Sourdough Soup
- all sourdough recipes
More Rye Flour Recipes


Premium Ad-Free membership includes:
-Ad-free content
-Print-friendly recipes
-Spice / Herb / Flower / Zest recipe collection PDF
-Weeknight Express recipe collection PDF
-Surprise bonuses throughout the year
Sourdough Starter Recipe
Pick a consistent time of day to commit to your starter duties. For me, mornings around 9am work best. If I'm doing two feedings, it's 9 am and 9pm. My kitchen temperature is typically around 70-73°F. Know that every starter is different, every kitchen its own environment. Getting your starter going could take just 2-3 days, or a few days longer. The following timeline is from my current kitchen. Your kitchen might be warmer or cooler than mine, and that might impact the overall time line. Keep it cozy if you can, or be a bit more patient if your kitchen runs a bit of a chill. I typically find that if I’m comfy, cozy, and happy, my starter is too.
- whole grain rye flour
- bread flour
- whole wheat flour
-
Day One: Combine 50 grams of rye flour with 50 grams of lukewarm (85°F) water. Use your fingers to stir it into a cement-like mixture. Scrape your fingers clean into the jar, smooth it out a bit, and cover the jar with a piece of cloth or loose lid. Place in a cozy spot - above refrigerator, etc.
-
Day Two: Stir with finger, scrape clean, replace cover or lid.
-
Day Three: Add 25 grams of rye flour and 25 grams of lukewarm water (85°F). Stir with your finger, scrape clean, and replace lid or cover.
-
Day Four: You might be seeing bubbles at this point. If you’re not, try using water that is a bit warmer, and keeping the jar in a warmer spot. Discard half of the starter. Add 50 grams lukewarm (85°F) water and 50 grams rye flour. Stir with your finger, scrape clean, and replace lid or cover.
-
Day Five: You should be seeing some good activity at this point. Discard half of the starter. Add 50 grams lukewarm (85°F) water and 50 grams rye flour. Stir (I typically start using a spoon at this point), and replace lid or cover.
-
Day Six: You should be seeing some lively activity by now - you’re looking for lots of bubbles and for your starter to roughly double in size. Discard all but two tablespoons of your starter. Add 50 grams lukewarm (85°F) water and 50 grams rye flour. Stir and replace lid or cover.
-
Day Seven: At this point you can continue feeding your rye starter and use it to make, say, a wonderful rye bread, OR convert it to a wheat starter - see notes below.
Sourdough Starter: Daily Maintenance:
- To feed a rye starter: discard all but a tablespoon of the starter each morning. Stir in 50 grams of room temperature water and 50 grams of rye flour. Cover and repeat the next day.
- To convert a rye starter to a wheat starter: combine 20 grams of rye starter in a jar with 50 grams of lukewarm water (85°F), 25 grams whole wheat flour, and 25 grams of bread flour. Stir, cover, and in a day or so, when the starter is rising and falling predictably, you can start baking with this starter. I aspire to feed my wheat starter twice a day, once at 9am and once at 9pm, but there are stretches where I on’y feed it once a day.
- To feed a wheat starter: discard all but a tablespoon of the starter, stir in 50 grams of room temperature water, 25 grams whole wheat flour, and 25 grams of bread flour. Cover and set aside until you’re ready to mix up dough or feed your starter again.
Related Recipes
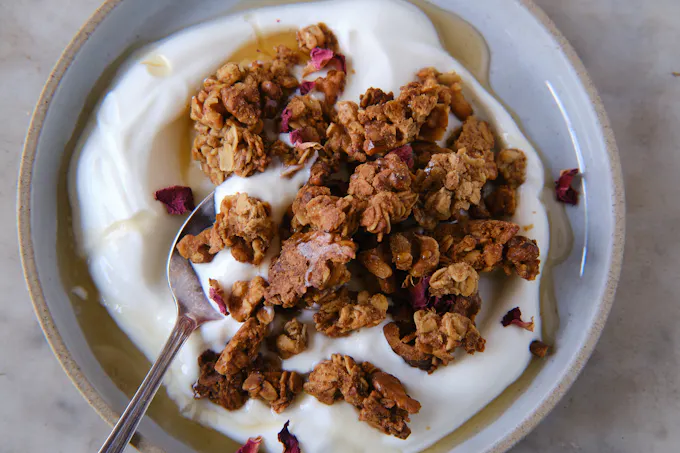
Sourdough Granola
This sourdough granola is the way to go if you love huge, golden, oat clusters. It’s maple-sweetened, cinnamon-kissed and a great way to use up a good amount of sourdough discard.

Sourdough Galette with Delicata Squash
A fully loaded winter sourdough galette topped with delicata squash, green chile yogurt, shallots, and scallions.
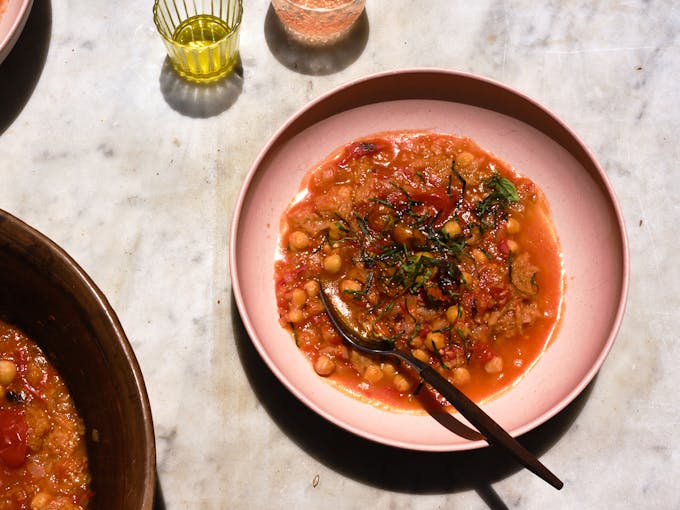
Roasted Tomato & Sourdough Soup
If you have both tomatoes and sourdough on hand, consider this. A spicy, saffron-smacked take on pappa al pomodoro, the bread-thickened Tuscan classic.
Post Your Comment
Comments
Thank you!! When you move the starter to a new jar, what implement do you use?
Hi Vl, I use a spoon.
would love to know your thoughts on kefir/flour starters. i’d read something about it but could never find a full proof recipe. i have the most wonderful kefir. i enjoy your blog so much. very generous offerings,excellent recipes!
Hi Judith, I haven’t experiment with kefir starters yet, but please check back if you dive deeper! And thanks for the kind words.
More Recipes
Weekly recipes and inspirations.
Popular Ingredients